How to Create a Custom Cushion Pattern or Template

Household indoor and outdoor cushions experience a lot of wear and tear over the years, and they eventually lose their shape and need replacement (usually in 4 to 7 years, depending on the quality of the foam). But what do you do when you can’t find the same uniquely shaped cushion to fit your chair or sofa? FoamOrder has you covered, and all you need to do is provide us with a custom cushion template or pattern. From there, we’ll quickly craft you a replacement cushion to your exact specifications.

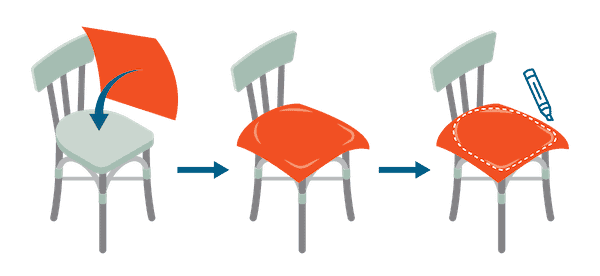
You need a pattern when the custom cushion you are ordering isn’t a perfect square, rectangle, L-shape or T-shape, or another standard geometric shape. A cushion template is simply a piece of paper that serves as a pattern for the shape of the custom cushion you’re ordering. Templates are quick and easy to make — you’ll probably be able to do it in under three minutes. Here, we show you how.

Step 1: Gather Your Materials

You’ll only need a few items to make your cushion template: a marker, a pair of scissors, and a large piece of sturdy paper or plastic or a light piece of cardboard. Craft paper is ideal and readily available at local supply stores if you don’t have it on hand, but even newspaper will suffice.

If you have a non-deformed cushion in very good condition that matches the one you want to replace, use this to create your template. If not, it’s important to make the template using the existing cushion cover or the space the old cushion occupied.

Step 2: Measure the Cushion and Trace an Outline

Your second step is to place the paper over the seat, making sure there’s plenty of overlap all the way around. Push the paper firmly into the creases and use the marker to draw a line through those creases. The line doesn’t have to be perfect; it just serves as a guide for cutting in the next step. Be sure to account for the cushion overhang in the front of the seat. We’ll need the rough measurements as well (to provide pricing based on the size of the cushion). You can check out handy measurement methods here.

Step 3: Cut Out the Template

Now that you have a rough outline of your template, it’s time to cut it out. The first time around, don’t cut on the marked line exactly; leave a little room around the edges in case you need to make alterations and cut more off. It’s always easier to trim the edges of a large template than to cut it too small and have to start over!

Get monthly updates on promotions, deals, and new products.

Step 4: Make the Template Symmetrical

Place your template over the top of the cushionless seat and see how it fits, then make any adjustments accordingly. Check that both sides of the template are the same, so that the pattern is uniform and usable as a template. You can do this by lining up the sides and folding it down the middle. If they don’t quite line up, trim until they do.

Step 5: Choose Your Fabric, Foam Type, Firmness, and Covering

Lastly, choose which of our materials to use for the construction of the cushion. Whether you’re after an identical cushion to replace the old one or you’d rather upgrade it, we have a wide selection of foam options and firmness levels and dozens of fabrics for the upholstery cover.

If you’re also ordering a fabric cover, note where the zipper should go directly on the pattern by writing “zipper here” and drawing a hashed or squiggly line. Once you order, you can also write your order number right onto the pattern to keep it from getting lost or misplaced.

Step 6: Place Your Order

Easy, right? Your template is all done! Now, simply place your order with us, and we’ll let you know where to send your template.